1200 Gallon Concrete Stingray Pond

bcarlos

Member
This project has been a long time in the making, and I finally started to make some progress during the holidays. There was a lot of electrical and insulation work that had to be done with this room, as it was a completely barren room when I started. I will update this thread as progress continues.

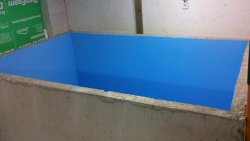
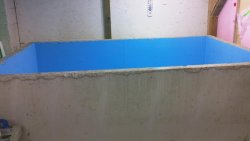
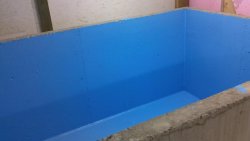
I had this tank custom poured by a friend of mine who specalizes in concrete tanks for fuel and sewage holding. The dimensions are 8 1/2 feet' X 5 1/2' X 3 1/2', and with 3 inch thick reinforced walls, this beast weighs over 3 tonnes. Needless to say, it took some serious surgical precision with a crane truck to get this thing in place.

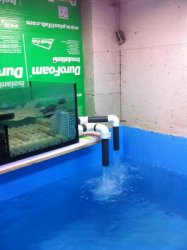
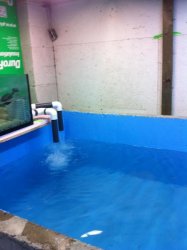
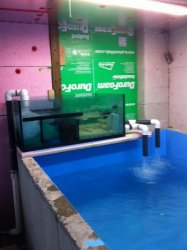
Here are some photo's after the first coat of rubberized paint. I'm very happy with how this colour turned out --
 

Attachments

  • 100_0045.jpg
    100_0045.jpg
    29.4 KB · Views: 695
  • 100_0046.jpg
    100_0046.jpg
    27.5 KB · Views: 684
  • 100_0047.jpg
    100_0047.jpg
    24 KB · Views: 680

skynoch

Moderator
Looks great so far. What are you using for waterproofing? Is there any holes cored in the pond or is all the filtering going to be above the tank? Waterfall style? Closed top? Way to many questions,lol.
I'm looking forward to following the progression on this build as I'm sure there was alot of thought put into it.
 

bcarlos

Member
tagging along ...btw bcarlos what filter/s you planning to run on that beast?

I had some fun with the filtration system. I went with a Hayward Max flow pump that essentially turns the tank over just over 5X/hr @ 2 inch piping. The pump runs through a 4000 gal capacity mechanical canister filter, filled with jap mat and filter floss. Originally, I was going to use this as my bio filter as well, but I came into a Hayward Top Mount Sand filter (typically used for pool filtration) and decided to turn this into a bio tower of sorts. I've got 100 lbs of small piece lava rock, 50 lbs of bio rings and 50 pieces of bacteria house.

I've also been playing around with an aquaponics trough idea, but this may come later :)

I expect to have the plumbing done by this weekend. Pics to follow, of course.

Looks great so far. What are you using for waterproofing? Is there any holes cored in the pond or is all the filtering going to be above the tank? Waterfall style? Closed top? Way to many questions,lol.
I'm looking forward to following the progression on this build as I'm sure there was alot of thought put into it.

Lol alright, a lot of answers for a lot of questions:

1. I had chlorinated rubber custom mixed to that beautiful sky blue. The concrete was sandblasted and three coats of the chlorinated rubber compound were applied. Essentially, it's a painted on pool liner.

2. I had a two inch exit fixture installed on the bottom right side of the tank. Two inch plumbing will run from here to the pump, and also out to the drain for backwashes.

3. The water will re-enter the pond through a PVC spraybar that will run the length of the tank.
 

bcarlos

Member
Worked on some of the plumbing and filtration system today. I built a suction bar (see pics 1 and 2) that runs the width of the tank. Water is pulled through holes drilled at the bottom of the PVC. The pump is very powerful, so this will help disperse suction and should keep the bare bottom pretty clean too.

Also installed the pump, filter and heater (see pic 3). The filter is filled with bio media and small pieces of lava rock. The heater works by passing water through the element before it enters the tank. I think this is the best option for a ray tank, although running 100 feet of BX wire from the heater to the circuit box was not fun or cheap.

I have a small above tank sump left to install that will hold my bacteria house and jap mat, as well as some aquaic plants. The tank should be up and running by mid week.
 

Attachments

  • IMG_0028.jpg
    IMG_0028.jpg
    33.6 KB · Views: 631
  • IMG_0030.jpg
    IMG_0030.jpg
    16.6 KB · Views: 636
  • IMG_0038.jpg
    IMG_0038.jpg
    27.4 KB · Views: 645

chen88

Super Moderator
Looking look Brandon. Can't wait to see you get those henleis in there.
 
Last edited:

bcarlos

Member
Tank is up and running as of last night. The heater is incredible-- water went from ice cold to 81 degrees in about four hours. I still need to get a few pieces of jap mat cut to fit the sump, but other than that this thing just needs to cycle before I can start introducing the rays.
 

Attachments

  • Picture 007.jpg
    Picture 007.jpg
    32.4 KB · Views: 678
  • Picture 008.jpg
    Picture 008.jpg
    27.4 KB · Views: 660
  • Picture 009.jpg
    Picture 009.jpg
    32 KB · Views: 686
  • Picture 004.jpg
    Picture 004.jpg
    46.7 KB · Views: 676

hustler

New Member
Im digging the above water sump :)
I had one a long while back for a koi pond and it was awesome both to clean and the flow rates....
Can wait to see more pics
 

bcarlos

Member
Moved the first female today. Thanks to Tim for recommendations on how to move her, everything went very smoothly. Some really bad pics taken quickly with a camera phone.

I should have a video by Thursday with all of them in the new set up.
 

Attachments

  • Picture 001.jpg
    Picture 001.jpg
    28.4 KB · Views: 637
  • Picture 002.jpg
    Picture 002.jpg
    22.1 KB · Views: 629
  • Picture 003.jpg
    Picture 003.jpg
    19.3 KB · Views: 619

bcarlos

Member
All the rays are in and were eating within an hour of being moved. They look great, and seeing how small they look in this tank is giving me a serious itch for more!

I shot two videos-- one with the filter on, so you can see how the system works, and one without so you can get a good look at what the rays look like.


snow

New Member
I sure wish I had room for something like this. Are you just going to have the rays in there or are you planning other fish?
 

chen88

Super Moderator
WOW....very cool and BIG. Those Henlei's are looking mighty fine and happy in there!....

You need more in there...or at least one more ;)
 
Top